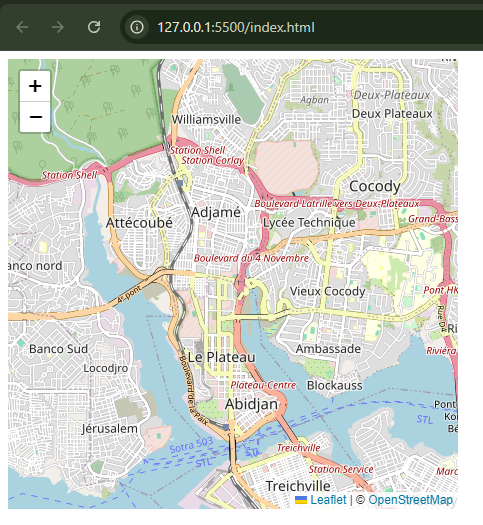
Building a Facebook Profile Location Tracker: A Step-by-Step Guide to Mapping Social Media Movements

Social media movements are organized initiatives that use internet platforms like Facebook, Instagram, TikTok, or Twitter to gain leverage and raise awareness of social, political, environmental, and cultural concerns. The real time nature of social media combined with its vast audience and the right strategy can make it fairly easy to go viral.

The impact of the social media movement in our society has raised a lot of concern regarding whether or not the government should exercise more control when it comes to the use of social media. The adoption of technologies for social media data tracking and analysis allows organizations to gain valuable insights into user movements and behavior on social media. This blog will guide you through building a Facebook profile location tracker using The Social Proxy Scraper API and AI tools.

What is a Facebook profile location tracker?

A Facebook profile location tracker is a tool that collects location data pertaining to posts, check-ins, and features like the share feature through Messenger. The data collected get analyzed to improve and influence user activity. They can also produce a visual representation of where users have been based on their shared content.

Facebook location trackers are important because their data provides a visual representation of user location and allows social media mapping, increasing organizational access to marketing information. This helps brands understand market trends, customer behavior, create local campaigns, and track influencer activity.

Understanding The Social Proxy’s tools

The Social Proxy offers reliable tools that are easy to use and can help you tap into rich data. Some of these tools include data tools (e.g. AI Social Lookup, AI Geo Lookup, and AI Street View), mobile proxies, residential proxies, and The Scraper API, each providing a different set of data.

The Scraper API provides more comprehensive data from social media platforms that can be narrowed down to a specific data type. Meanwhile, residential proxies provide you with information about geolocated residential IPs, which requires you indicate the country, state, and city.

The Geolocation API is a service that accepts an HTTPS request with the cell tower and WiFi access points that a mobile client can detect. Visit this link to create an account and gain access to The Social Proxy Dashboard.

How to build a Facebook profile location tracker

You’ll need the following in order to build a Facebook profile location tracker:

  • Node.js and required libraries
  • A virtual environment
  • The Social Proxy Scraper API
  • ChatGPT API
  • AI Geo Lookup
  • Google maps API

Step 1: Set up your development environment

Install Node.js on Windows/Mac via Installer:

  1. Visit the official Node.js website.
  2. Download the appropriate installer for your system (Windows or macOS).
  3. Run the installer and follow the setup instructions.
  4. Verify the installation by opening your terminal (or command prompt on Windows) and typing: ’node-v’ This should display the installed Node.js version.

Set up a virtual environment

We’ll use Node Version Manager (NVM) to manage different versions of Node.js for different projects, while npm and npx for managing dependencies. Running NVM on Windows requires a specific version called nvm-windows, as the original NVM was developed primarily for Unix-based systems (Linux/macOS). Here’s how to install and use nvm-windows:

  • Download the .zip or .exe file from the latest release on Github click here.
  • Open the downloaded file and run the installer. Follow the on-screen instructions.
  • Open your terminal after installation, to confirm installation paste nvm version.

Once you’ve successfully installed your Node.js and set up your virtual environment on Windows, you’ll need to create an account and generate a Scraper API with The Social Proxy.

Step 2: Scrape Facebook posts using The Social Proxy Scraper API

Let’s use the Scraper API Key and Secret that we’ve generated following the instruction above to scrape text and images from a specific Facebook profile with other libraries like Axios, and Cheerio. First we need to create a directory. Open your terminal and run the code below on Git Bash or PowerShell:

				
					Hp@dule-lab MINGW64 /c/ProjectsXYZ
$ mkdir facebook_profile_location_tracker


Next, cd into the folder you just created by running the following command:

				
					Hp@dule-lab MINGW64 /c/ProjectsXYZ
$ cd facebook_profile_location_tracker


Install the libraries mentioned above:

				
					Hp@dule-lab MINGW64 /c/ProjectsXYZ/facebook_profile_location_tracker
$ npm install cheerio


					npm install openai axios request


Visit The Social Proxy Dashboard to get your API endpoint for Facebook. Here is our endpoint : GET /wp-json/tsp/facebook/v1/posts/node

Here is the script we’ll use to perform the scraping task:

				
					const axios = require('axios');
const cheerio = require('cheerio');


//Facebook profile URL
const profileUrl = 'https://www.facebook.com/username';


//ScraperAPI URL
const socialProxyApiUrl = `https://thesocialproxy.com/wp-json/tsp/facebook/v1/posts/node?consumer_key=ck_5d08e0a7c419af9d7a90c76d1019559b53d9815a&consumer_secret=cs_9636ac43e09a78a4e8ab06181d061836ded1af39&node_id=UzpfSTQ6MTAxMTUxODY0ODg0ODIxNDE=&url=${encodeURIComponent(profileUrl)}`


// Scrape the Facebook profile
async function scrapeFacebookProfile() {
    try {
        // Make a request to the Social Proxy Scraper API
        const { data } = await axios.get(socialProxyApiUrl, {headers:{"Content-Type": "application/json"}});


        //Load the HTML using cheerio
        const $ = cheerio.load(data);


        //Extract the profile name
        const profileName = $('title').text();
        console.log('Profile Name', profileName);


        //Extract text posts
        const posts = $('div._5pbx').map((i, element) => $(element).text()).get();
        console.log('Posts:', posts);


        //Extract images from the profile
        const images = $('img').map((i, element) => $(element).attr('src')).get();
        console.log('Images:', images);


    } catch (error){
        console.log('Error scraping profile:', error.message);
    }
}


scrapeFacebookProfile();


Running the above script using a Facebook profile URL will allow the script to scrape for text and images displaying them in an array.

To store data that has been scrapped by our previous script, we’ll write a function to fetch all locations from the scraped data.

				
					// Function to retrieve location data
async function fetchLocations(){
    try{
        const response = await axios.get(`${socialProxyApiUrl}/location`);
        console.log('Locations fetched:', response.data);
        return response.data; // This would return an array of locations
    } catch (error) {
        console.error('Error fetching locations:', error);
    }
}
fetchLocations();


With the fetchLocations function defined and executed, we’ll get the result shown below:

Now that we’ve succeeded in fetching all locations, we can store the data.

				
					async function storeLocation(locationData) {
    try {
        const response = await axios.post(`${socialProxyApiUrl}`, locationData);
        console.log('Location stored:', response.data);
    } catch (error) {
        console.error('Error storing location:', error)
    }
}


Step 3: Analyze text for the mentioned locations

Visit OpenAI and reference the following steps to use ChatGPT API to identify location names in text.

Install the SDK package for OpenAI using npm

				
					Hp@dule-lab MINGW64 /c/ProjectsXYZ/facebook_profile_location_tracker
$ npm install openai


Use “import openai” in your code and write a script to identify locations in text.

				
					// Function to extract locations
async function extractLocations(text) {
  const prompt = `Identify all location names (countries, cities, landmarks) in the following text: ${text}`;
 
  try {
    const response = await openai.createChatCompletion({
      model: "gpt-4",  // or 'gpt-3.5-turbo'
      messages: [
        { role: "system", content: "You are a helpful assistant that extracts location names." },
        { role: "user", content: prompt },
      ],
    });
   
    // Extract the result from the response
    return response.data.choices[0].message.content;
  } catch (error) {
    console.error("Error extracting locations:", error);
  }
}


// Example text caption
const text = "This in-person event will be held at NTA Road, Port Harcourt, Nigeria.";
extractLocations(text).then(locations => {
  console.log(locations);
});


You’ll receive the following output:
Text: “This in-person event will be held at NTA Road, Port Harcourt, Nigeria.”
An example of what the API returns: “NTA Road, Port Harcourt, Nigeria”

Step 4: Use AI Geo Lookup to identify locations from images

We’ll use The Social Proxy GEOLOCATE-IMAGE endpoint to upload an image and AI Geo Lookup to identify the location.
API endpoint: POST /wp-json/tsp/geolocate/v1/image

				
					// Uploading image using the Geolocate-image endpoint
async function detectLandmarks(imagePath) {
  // Performs landmark detection on the image file
  const [result] = await client.landmarkDetection(imagePath);
  const landmarks = result.landmarkAnnotations;


  if (landmarks.length === 0) {
    return "No landmarks found.";
  }


  const locations = landmarks.map(landmark => ({
    description: landmark.description,
    score: landmark.score, // Confidence score
    locations: landmark.locations.map(location => ({
      latitude: location.latLng.latitude,
      longitude: location.latLng.longitude
    }))
  }));


  return locations;
}


// Example usage
(async () => {
  const imageUpload = 'C:\ProjectsXYZ\facebook_profile_location_tracker\image\Dule-Martins.jpg'; //Upload image from local devices
  const imagePath = `https://thesocialproxy.com/wp-json/tsp/geolocate/v1/image?consumer_key={CONSUMER_KEY}&consumer_secret={CONSUMER_SECRET}=&url=${encodeURIComponent(imageUpload)}`; // Replace with the path to your image
  const landmarks = await detectLandmarks(imagePath);
  console.log(landmarks);
})();


While on your dashboard, navigate from your sidebar to the “Data Tools” and click on “AI Geo Lookup” to upload the file you want AI to analyze and find the location associated with it.

Step 5: Build a map to visualize movement over time

In this section, we’ll use Leaflet, a JavaScript library to map our data. The data used includes timestamps and coordinates.

Here is our HTML, CSS file with Leaflet.js:

				
					<head>
    <title>Locational movement on a map</title>
    
    <meta name="viewport" content="width=device-width, initial-scale=1.0">


    <!-- Include Leaflet CSS and JavaScript -->
    
    <script src="https://unpkg.com/leaflet@1.9.3/dist/leaflet.js"></script>


    <!-- Include TimeDimension plugin -->
    <script src="https://cdnjs.cloudflare.com/ajax/libs/leaflet-timedimension/1.1.0/leaflet.timedimension.min.js"></script>
    
   
    <style>
        #map {
            height: 700px;
        }
    </style>
</head>


Shown above is the head tag of an HTML file with a CSS tag, links to Leaflet CSS, and its Javascript source link including a TimeDeminsion plugin. Below we can see the body tag.

				
					<body>


<div id="map"></div>


<script>
    // Initialize the map and set its view
    var map = L.map('map').setView([5.340541839599609, -4.019353866577148], 13);


    // Adding the OpenstreetMap tile layer to our map
    L.tileLayer('https://tile.openstreetmap.org/{z}/{x}/{y}.png', {
        maxZoom: 19,
        attribution: '&copy; <a href="http://www.openstreetmap.org/copyright">OpenStreetMap</a>'
    }).addTo(map);


    // Example GeoJSON data
    var geojsonData = {
        "type": "FeatureCollection",
        "features": [
            {
                "type": "Feature",
                "geometry": {
                    "type": "Point",
                    "coordinates": [8.469864845275879, -13.282469749450684]
                },
                "properties": {
                    "time": "2024-09-11T00:00:00Z",
                    "popup": "Start Point"
                }
            },
            {
                "type": "Feature",
                "geometry": {
                    "type": "Point",
                    "coordinates": [18.62063217163086, -68.70802307128906]
                },
                "properties": {
                    "time": "2024-09-12T12:00:00Z",
                    "popup": "Next Point"
                }
            },
            {
                "type": "Feature",
                "geometry": {
                    "type": "Point",
                    "coordinates": [4.786264896392822, 7.001723766326904]
                },
                "properties": {
                    "time": "2024-09-13T12:00:00Z",
                    "popup": "Next Point"
                }
            },
            {
                "type": "Feature",
                "geometry": {
                    "type": "Point",
                    "coordinates": [5.632641792297363, -0.17155399918556213]
                },
                "properties": {
                    "time": "2024-09-14T12:00:00Z",
                    "popup": "End Point"
                }
            }
        ]
    };


    // Convert GeoJSON to TimeDimension Layer
    var geojsonLayer = L.geoJSON(geojsonData, {
        onEachFeature: function (feature, layer) {
            if (feature.properties && feature.properties.popup) {
                layer.bindPopup(feature.properties.popup);
            }
        }
    });


    var timeDimensionLayer = L.timeDimension.layer.geoJson(geojsonLayer, {
        updateTimeDimension: true,
        addlastPoint: true,
        duration: 'PT1H' // Point duration for the animation
    });


    // Add time dimension layer to the map
    timeDimensionLayer.addTo(map);
   
    // Adding a marker
    var marker = L.marker([7.00, 4.786]).addTo(map);
</script>


<script>class RocketElementorAnimation{constructor(){this.deviceMode=document.createElement("span"),this.deviceMode.id="elementor-device-mode-wpr",this.deviceMode.setAttribute("class","elementor-screen-only"),document.body.appendChild(this.deviceMode)}_detectAnimations(){let t=getComputedStyle(this.deviceMode,":after").content.replace(/"/g,"");this.animationSettingKeys=this._listAnimationSettingsKeys(t),document.querySelectorAll(".elementor-invisible[data-settings]").forEach(t=>{const e=t.getBoundingClientRect();if(e.bottom>=0&&e.top<=window.innerHeight)try{this._animateElement(t)}catch(t){}})}_animateElement(t){const e=JSON.parse(t.dataset.settings),i=e._animation_delay||e.animation_delay||0,n=e[this.animationSettingKeys.find(t=>e[t])];if("none"===n)return void t.classList.remove("elementor-invisible");t.classList.remove(n),this.currentAnimation&&t.classList.remove(this.currentAnimation),this.currentAnimation=n;let s=setTimeout(()=>{t.classList.remove("elementor-invisible"),t.classList.add("animated",n),this._removeAnimationSettings(t,e)},i);window.addEventListener("rocket-startLoading",function(){clearTimeout(s)})}_listAnimationSettingsKeys(t="mobile"){const e=[""];switch(t){case"mobile":e.unshift("_mobile");case"tablet":e.unshift("_tablet");case"desktop":e.unshift("_desktop")}const i=[];return["animation","_animation"].forEach(t=>{e.forEach(e=>{i.push(t+e)})}),i}_removeAnimationSettings(t,e){this._listAnimationSettingsKeys().forEach(t=>delete e[t]),t.dataset.settings=JSON.stringify(e)}static run(){const t=new RocketElementorAnimation;requestAnimationFrame(t._detectAnimations.bind(t))}}document.addEventListener("DOMContentLoaded",RocketElementorAnimation.run);</script>
</body>


You can see the end result of our map below.

Conclusion

To build a Facebook profile location tracker, you need The Social Proxy consumer_key and consumer_secret. Using these key values authenticates the process of data access for mapping the movement of a user over time, while the Geo AI Lookup gives the latitude and longitude of the image uploaded.

Accessibility tools

Powered by - Wemake