How to Build a Disinformation Detector for LinkedIn: Verifying Industry News and Insights

LinkedIn is an essential platform for professionals to share career updates, company news, and insights. But as the volume of content increases, so does the risk of disinformation, which can harm reputations, mislead audiences, and poorly affect businesses. The Social Proxy recognizes the significance of trustworthy data, particularly when it comes to protecting your business against misinformation.For companies and professionals who rely on accurate information, having access to tools that filter out disinformation is critical.

In this tutorial, we’ll show you how to build a disinformation detector for LinkedIn using machine learning and data scraping to identify posts with inaccurate information without getting blocked. This guide is relevant for business professionals, data scientists, developers, social media analysts, and corporate communications teams. We’ll learn how to scrape data on LinkedIn and how to assess it for credibility.

A step-by-step guide to scraping LinkedIn posts and detecting false information on specific keywords

Scraping LinkedIn posts and identifying fraudulent information based on designated keywords involves gathering material from LinkedIn and using data analysis to determine if the content is real or fake. This approach involves setting up tools that automate post extraction, evaluate content, and verify its accuracy. We’ll employ keywords, scrape LinkedIn entries, and scan them for incorrect information.

Step 1: Set up your environment

Set up your workspace with either Python or Node.js.

  • Install Python or Node.js from their official websites.
  • Use the following command in your terminal to create a virtual environment in Python:
				
					python -m venv venv


This will create the virtual environment (venv), which will help get your project tools in order.

The Social Proxy Scraper API reduces LinkedIn anti-bot system detection by simulating real user behavior via residential proxies. Real IP address routing of your requests guarantees consistent and continuous data collecting.

Register on the The Social Proxy Scraper API to get your Consumer Key and Consumer Secret. Using the API requires keys to authenticate your queries, so that you can safely scrape LinkedIn data. Use the instructions below to create an account with The Social Proxy.

Follow this step-by-step guide to set up The Social Proxy:

  • Visit The Social Proxy’s official website.
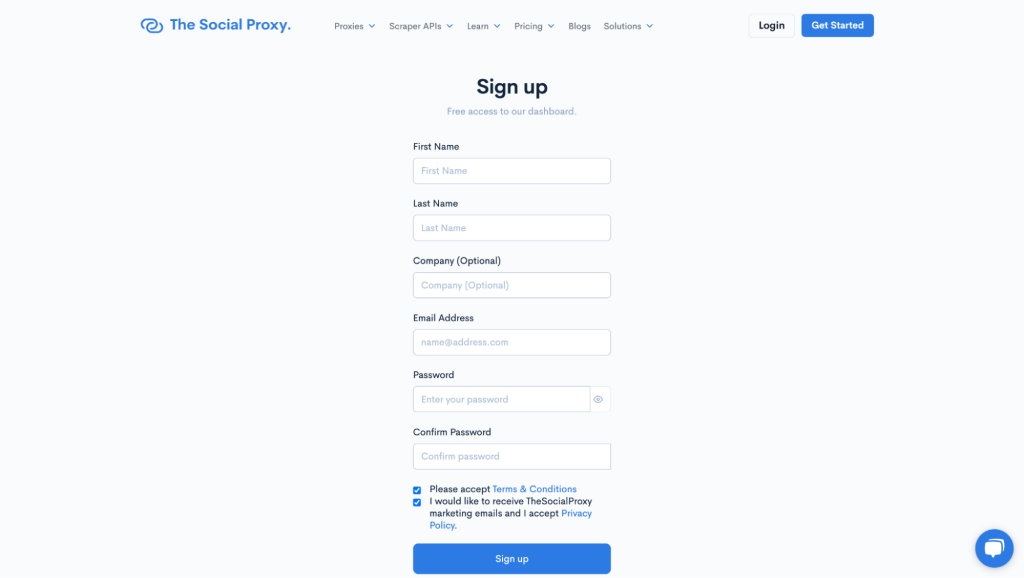
  • Click “Login” if you already have an account. To create a new account, click “Get Started” and follow the next steps.
  • Fill out the required fields in the signup form and click “Sign Up.”

Click on the account verification link sent to your email from The Social Proxy.

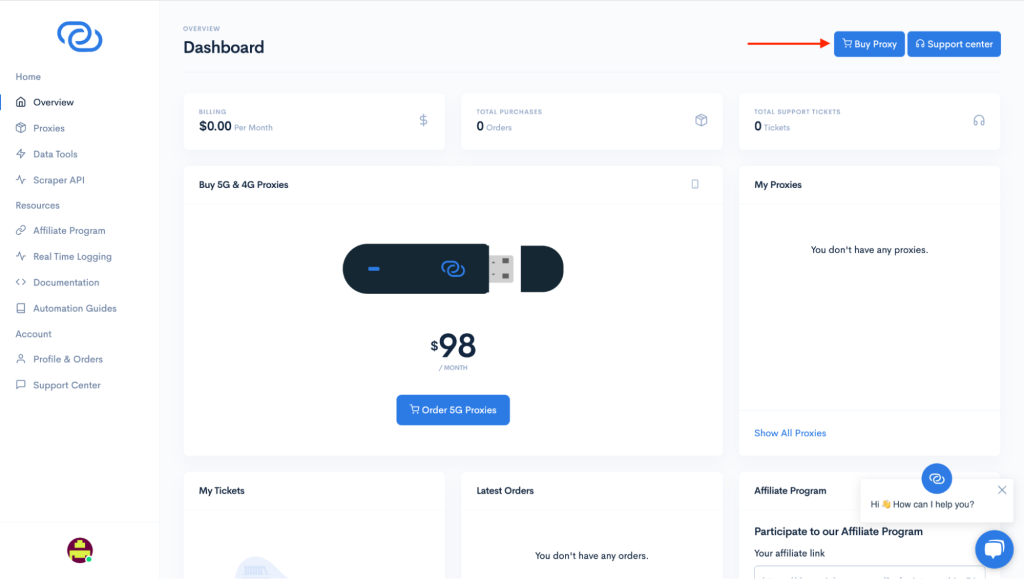
Access your dashboard on The Social Proxy and click on “Buy Proxy” to select a plan.

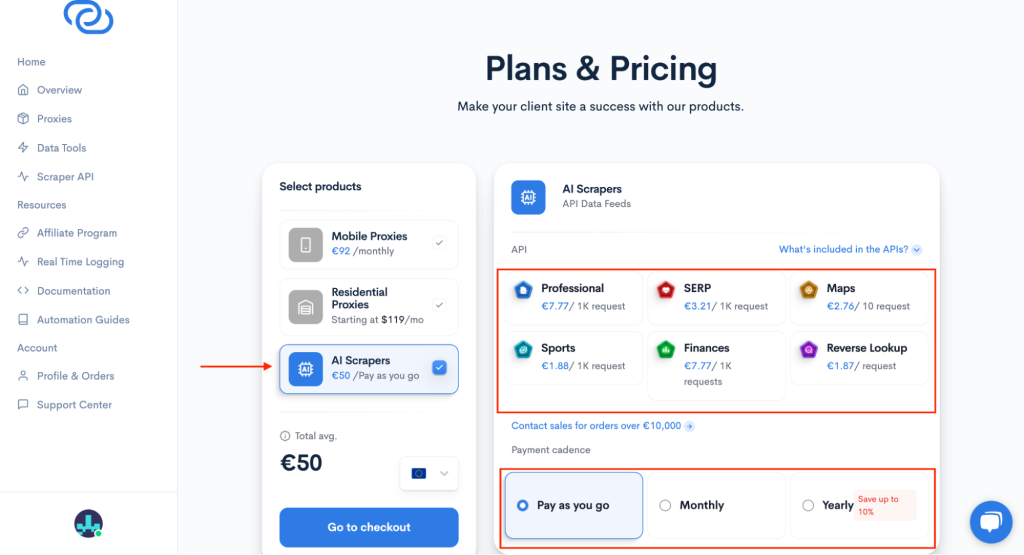
Choose a plan: In the buy proxies page, select “Scraper API,” choose your subscription type, and click “Go to checkout.”

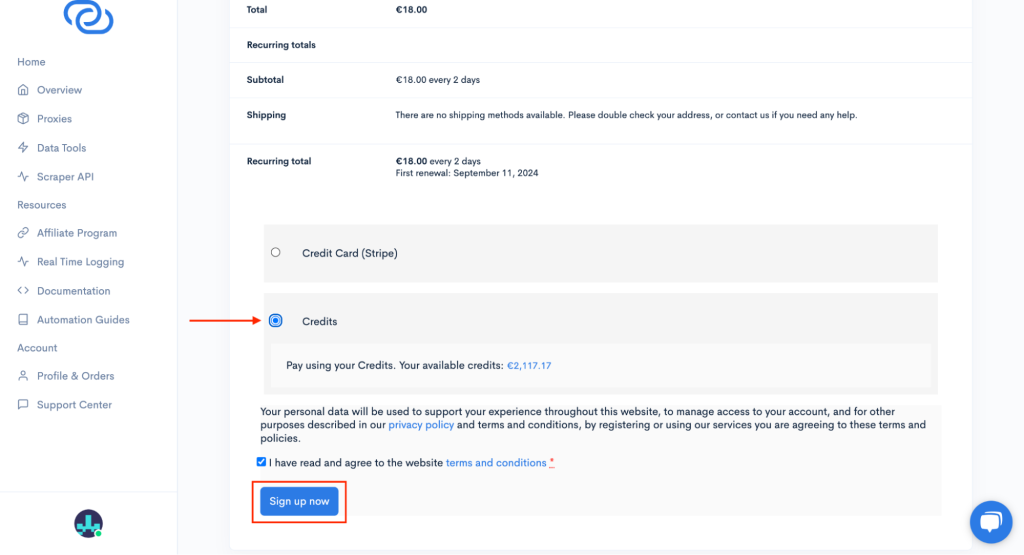
Provide payment details: Fill out your payment information and click “Sign up now.” Once you’ve signed up, you can proceed to use the Scraper API.


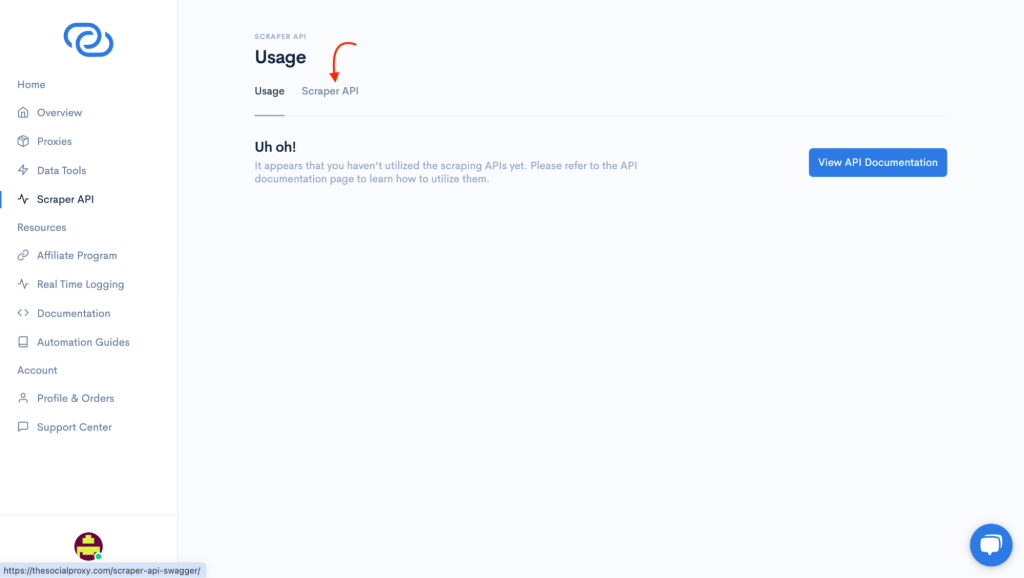
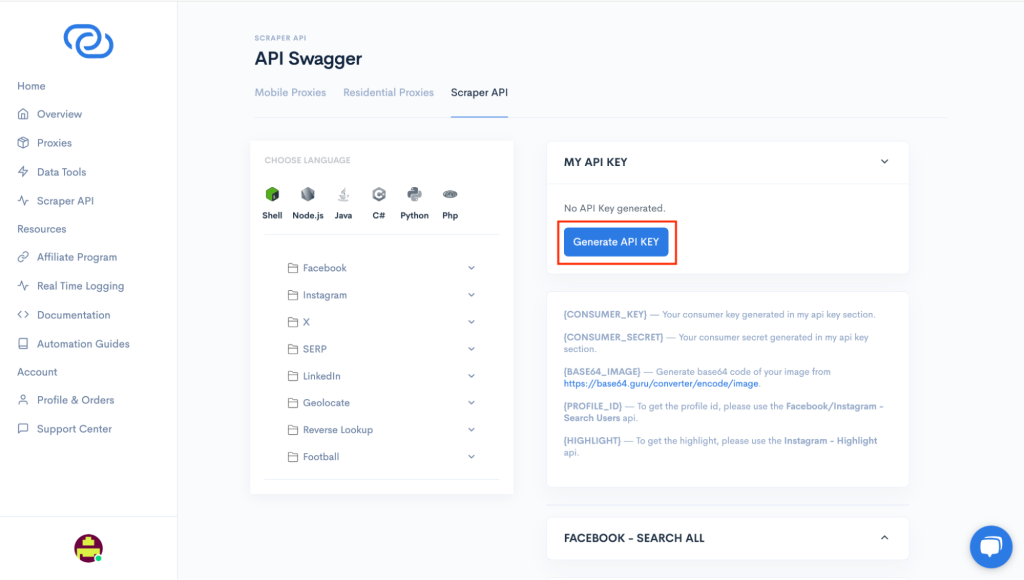
Generate your Scraper API keys: You need to generate your keys before you can start making API calls to the Scraper API. In the side menu, click “Scraper API” and select “Scraper API.”

Click on “Generate API KEY”.

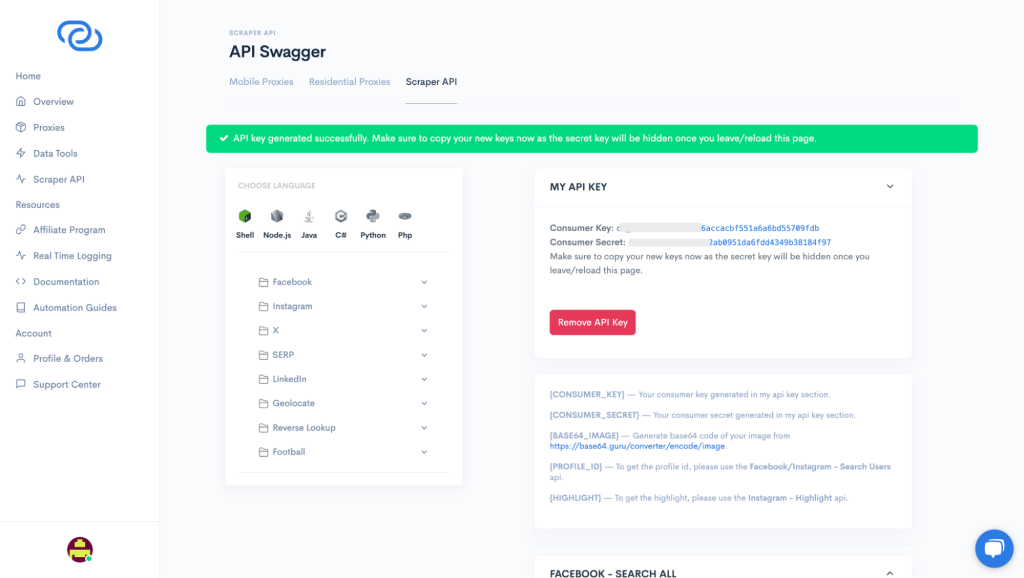
Copy your credentials: Copy your Consumer Key and Consumer Secret – you will need them in your code.

Step 2: Scrape LinkedIn posts for a specific keyword using The Social Proxy Scraper API

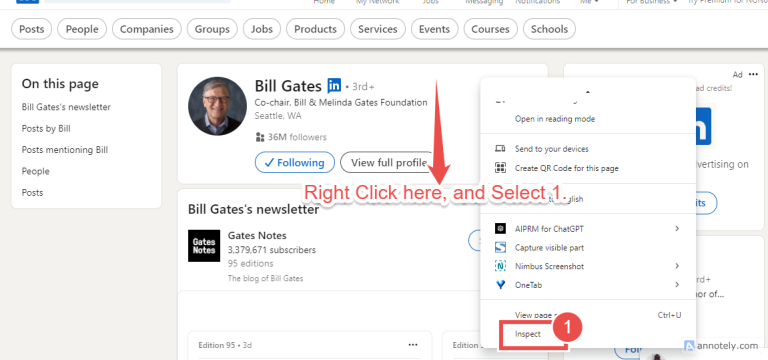
The first step to scraping a LinkedIn post is recognizing its HTML structure. To view the contents of the page, use the developer tools in your browser (right click on the LinkedIn post and choose to inspect).

Locate some key elements contained in a post’s content:

  • Post text: This is often found within a <span> or <div> element.
  • Author name: Typically located inside a <span> or <h3> element.
  • Timestamp: Found near the post date, usually within a <time> tag.

Once you’ve identified these elements, you can target them in your scraping script and install the necessary libraries.

For Python:

				
						pip install beautifulsoup4 selenium requests


For Node.js:

				
					npm install puppeteer cheerio axios


Search for the keyword: In this tutorial, we’ll target posts that mention “AI in Business.” Search the keyword on LinkedIn and then use the URL in your scraper.

The Social Proxy API authentication script is as follows:

				
					const axios = require('axios');

// API authentication credentials
const consumerKey = 'ck_5d08e0a7c419af9d7a90c76d1019559b53d9815a';
const consumerSecret = 'cs_9636ac43e09a78a4e8ab06181d061836ded1af39';

// Scraper API URL
const url = 'https://thesocialproxy.com/?api_key=' + consumerKey + '&url=https://www.linkedin.com/search/results/content/?keywords=AI%20in%20Business';

axios.get(url)
  .then(response => {
      console.log(response.data);
  })
  .catch(error => {
      console.error(error);
  });


Python Example Using Selenium and BeautifulSoup:

This Python example shows how to scrape the post content from a LinkedIn search page using BeautifulSoup and automate the browsing of the page using Selenium. After using Selenium to get the HTML, the code utilizes BeautifulSoup to parse and extract posts with a certain class.

				
					from selenium import webdriver
from bs4 import BeautifulSoup

#Set up Selenium
driver = webdriver.Chrome()
driver.get("https://www.linkedin.com/search/results/content/?keywords=AI in Business")


#Extract HTML 
html = driver.page_source
soup = BeautifulSoup(html, 'html.parser')

#To Find Post Content
posts = soup.find_all('div', class_='feed-shared-text')

for post in posts:
print(post.text)

driver.quit()


Node.js Example Using Puppeteer:

To scrape LinkedIn posts safely without getting blocked, you can use The Social Proxy Scraper API. It helps rotate proxies and manage scraping more efficiently.

Step 3: Data preprocessing and keyword-specific analysis

This Node.js example queries the page’s DOM using Puppeteer to traverse LinkedIn and retrieve postings. After loading a LinkedIn search page, it makes use of it. To run JavaScript in the browser and retrieve all elements with the class feed-shared-text, which contains the posts, use the evaluate() function.

				
					const puppeteer = require('puppeteer');
	
  (async () => {
   const browser = await puppeteer.launch();
   const page = await browser.newPage();
  Await page.goto('https://www.linkedin.com/search/results/content/?keywords=AI in Business');

const posts = await page.evaluate(() => {
return Array.from(document.querySelectorAll('.feed-shared-text')).map(post => post.textContent);
});

console.log(posts);

await browser.close();
})();


To scrape LinkedIn posts safely without getting blocked, you can use The Social Proxy Scraper API. It helps rotate proxies and manage scraping more efficiently.

Step 3: Data preprocessing and keyword-specific analysis

Now that we’ve scraped the LinkedIn posts, we have to clean and arrange the data by trimming out irrelevant content and concentrating on pieces that use the goal phrase, in this case, “AI in Business.”

To clean and structure your data:

  • Remove HTML tags: If any tags are left from the scraping process, use tools like BeautifulSoup or regular expressions to strip them.
  • Filter relevant posts: Keep only the posts that mention “AI in Business.” You can check for keyword presence using simple Python conditions or JavaScript string methods
  • Structure data: Store the cleaned post in a structured format, like a CSV or JSON file, with fields such as Post Text, Author, Timestamp, and Keyword Match.

Use this Python code snippet to clean and filter the scraped posts:

				
					import re
import pandas as pd

# Example: list of scraped posts
posts = ["AI in Business is transforming the industry.", "Random post", "Another AI in Business case study."]

# Clean the posts and filter based on keyword
keyword = "AI in Business"
cleaned_posts = [re.sub('<.*?>', '', post) for post in posts if keyword in post]

# Organize into a DataFrame
df = pd.DataFrame(cleaned_posts, columns=['Post Content'])
df.to_csv('linkedin_posts.csv', index=False)


Once the data has been cleaned, we can extract important attributes associated with the term “AI in Business.” These characteristics will be useful later on when we want to identify misleading information. We’ll consider the following:

  • Context of keyword usage: Look at the sentences or paragraphs where “AI in Business” appears. Are the mentions positive, negative, or neutral? What’s the surrounding context?
  • Hashtags: Extract accompanying hashtags, which can help understand the broader topic or trend the post is contributing to.
  • User engagement metrics: Measure the amount of attention a post is gaining via data pertaining to the number of comments, shares, or reactions. This can provide insights regarding how widely spread potential misinformation might be.
				
					# Extract hashtags
hashtags = [re.findall(r"#(\w+)", post) for post in cleaned_posts]

# Example engagement data (manually scraped or added)
engagement = [15, 30, 50]  # hypothetical engagement data (likes/comments)

# Add hashtags and engagement to DataFrame
df['Hashtags'] = hashtags
df['Engagement'] = engagement


Natural Language Processing (NLP) tools can help us understand the deeper meaning and context of posts. It’s crucial to examine the discourse around “AI in Business” to identify misinformation.

  • Tokenization: Using this technique allows us to break the post into smaller units (words or phrases).
  • Sentiment analysis: This determines if the posts about “AI in Business” are positive, negative, or neutral.
  • Contextual understanding: Use models like spaCy or NLTK to analyze the context around the keyword and understand whether the posts provide factual information or make exaggerated claims.
				
						import nltk
from nltk.sentiment import SentimentIntensityAnalyzer

# Initialize sentiment analyzer
sia = SentimentIntensityAnalyzer()

# Analyze the sentiment of each post
for post in cleaned_posts:
    sentiment = sia.polarity_scores(post)
    print(f"Post: {post}\nSentiment: {sentiment}\n")


With the use of these tools, you’ll be able to examine the discourse surrounding “AI in Business” and detect false information based on context and sentiment.

Step 4: Build a keyword-specific disinformation detection model

We’ll need a machine learning model to evaluate the meaning of the text and its content and identify misinformation in LinkedIn posts. NLP-based models are great for detecting deception related to keywords. BERT (Bidirectional Encoder Representations from Transformers) is a popular model that is very good at evaluating the context in which keywords arise. Based on the way phrases like “AI in Business” are used in articles, BERT can assist in separating fact from fiction.

Alternatively, you can custom-train a model exclusive to your dataset using instances of true and false data. Follow the steps below to train a disinformation detection model using labeled data:

  • Prepare the data: You’ll need a dataset with labeled examples of both true and false about “AI in Business.” The dataset should include text posts with labels indicating whether the information is accurate or misleading.
  • Choose a model: We’ll use BERT to detect disinformation because of its ability to understand complex language structures. You can also use a simpler model like a Logistic Regression or Support Vector Machine (SVM) if you have limited computational resources.

To use BERT, you can leverage the transformers library in Python:

				
					pip install transformers


Preprocess the text data: BERT requires special tokenization that preserves the context of words in a sentence. Tokenize and prepare the text data for training.

				
					from transformers import BertTokenizer

# Initialize the BERT tokenizer
tokenizer = BertTokenizer.from_pretrained('bert-base-uncased')

# Tokenize the posts
posts = ["AI in Business boosts efficiency.", "AI in Business is dangerous."]
inputs = tokenizer(posts, return_tensors='pt', padding=True, truncation=True)


  • Train the model: Split your labeled dataset into training and validation sets. Fine-tune the BERT model (or your chosen model) using your labeled data.

Here’s a simplified example for training a BERT model:

				
					from transformers import BertForSequenceClassification, Trainer, TrainingArguments
from sklearn.model_selection import train_test_split

# Initialize the BERT model for classification
model = BertForSequenceClassification.from_pretrained('bert-base-uncased', num_labels=2)

# Split data into training and validation sets
train_texts, val_texts, train_labels, val_labels = train_test_split(posts, labels, test_size=0.2)

# Define training arguments
training_args = TrainingArguments(output_dir='./results', num_train_epochs=3, per_device_train_batch_size=16)

# Initialize the Trainer
trainer = Trainer(model=model, args=training_args, train_dataset=train_texts, eval_dataset=val_texts)

# Train the model
trainer.train()


  • Evaluate the model: After training, evaluate your model’s accuracy on the validation set. This will provide you with insights on how well the model detects true and false information. You can assess performance using accuracy, precision, and recall metrics.
				
					eval_results = trainer.evaluate()
print(f"Validation Accuracy: {eval_results['eval_accuracy']}")


  • Deploy the model: Once the model is sufficiently accurate, you can deploy it to analyze new LinkedIn posts. The model will predict whether the post is spreading false information about “AI in Business” based on the context of the post.

Step 5: Implement the keyword-specific disinformation detector

Now it’s time to combine your trained misinformation detection model with your LinkedIn scraper to examine posts that mention the target keyword (“AI in Business”).

Link the scraper and model: Once you’ve gathered text data from LinkedIn posts, clean it up and feed it into your trained misinformation detection model. To do so, add a phase in your scraper script that sends each post to the model for analysis.

				
					# Scrape posts (from Step 2)
posts = ["AI in Business boosts efficiency.", "AI in Business is dangerous."]

# Tokenize and send posts to the model for disinformation detection
inputs = tokenizer(posts, return_tensors='pt', padding=True, truncation=True)
predictions = model(**inputs).logits

# Interpret the model's output (e.g., 0 = True, 1 = False)
predicted_labels = predictions.argmax(dim=1)
for post, label in zip(posts, predicted_labels):
    if label == 1:
        print(f"Disinformation detected: {post}")
    else:
        print(f"Verified information: {post}")


This will provide you with a basic integration in which the disinformation detector analyzes the scraped posts and assigns a label (true or false information) to each post.

Follow these steps to run the disinformation detector on batch or real-time data:

  • Batch analysis: Collect a batch of posts, scrape them using your LinkedIn scraper, and then run them through your model all at once. This method is useful when analyzing a large set of historical posts.
				
					# Batch process scraped posts
posts = ["Post 1...", "Post 2...", "Post 3..."]  # Add your scraped posts here
inputs = tokenizer(posts, return_tensors='pt', padding=True, truncation=True)
predictions = model(**inputs).logits


  • Real-time detection: For real-time analysis, scrape Linkedin periodically (e.g. every hour or every day) and run newly scraped posts through the disinformation model as they are collected.

The example below uses a simple loop to check for new posts:

				
					while True:
    new_posts = scrape_linkedin_for_keyword("AI in Business")  # Add scraping function
    if new_posts:
        inputs = tokenizer(new_posts, return_tensors='pt', padding=True, truncation=True)
        predictions = model(**inputs).logits
        predicted_labels = predictions.argmax(dim=1)
        for post, label in zip(new_posts, predicted_labels):
            print(f"Post: {post} | Label: {'Disinformation' if label == 1 else 'Verified'}")
    time.sleep(3600)  # Wait for 1 hour before scraping again


Sometimes posts are improperly classified by disinformation detection models, which can result in false positives (classifying true material as false) or false negatives (missing real disinformation). Such instances can be reduced using the following tactics:

  • Threshold tuning: Instead of relying on a fixed decision (e.g. if the model predicts 1, it’s disinformation), adjust the decision threshold. For example, you might flag posts only if the model is more than 80% confident that the information is false.
				
					# Adjusting threshold for more confident predictions
threshold = 0.8
predictions = model(**inputs).logits
probabilities = torch.nn.functional.softmax(predictions, dim=1)
for post, probability in zip(posts, probabilities):
    if probability[1] > threshold:  # Label as disinformation if confidence > 80%
        print(f"Disinformation detected with high confidence: {post}")
    else:
        print(f"Verified information: {post}")


  • Manual review for critical cases: For posts with borderline confidence levels, consider flagging them for manual review rather than automatically labeling them as true or false. This is especially helpful when the stakes of misclassification are high (e.g. critical business decisions).
  • Model retraining: Regularly retrain the model with updated data, especially as new disinformation trends emerge. This will help the model stay accurate and up to date with the latest patterns in misleading information related to your keyword.

By integrating the trained model with your LinkedIn scraper and carefully managing potential errors, you can effectively detect and flag disinformation in keyword-specific LinkedIn posts, maintaining a high level of trust in professional discussions around “AI in Business.”

Conclusion

In this tutorial, we reviewed all of the necessary procedures in this article to find false information on LinkedIn posts using specific keywords. We reviewed how to scrape posts from LinkedIn, clean and preprocess the data, create a machine learning model to identify disinformation, and how to integrate the model with your scraper to analyze data in batch or real-time. You can quickly spot false information by utilizing machine learning and NLP techniques.

The most important lesson is how crucial it is to identify misinformation quickly and accurately, especially for professionals who depend on sites like LinkedIn to get industry insights. As conversations about AI become more and more prevalent, it’s important to ensure accurate information. Check out The Social Proxy’s services to enhance your misinformation detection and LinkedIn scraping capabilities.

Accessibility tools

Powered by - Wemake