Building a LinkedIn Profile Location Tracker: A Step-by-Step Guide to Mapping Social Media Movements

As a professional, it’s inevitable that at some point, you’ll interact with LinkedIn, a social platform that allows you to expand your professional network, identify talent, and expose yourself and your work. This platform uses the information it has to propose much more value than meets the eye. One of the most commonly overlooked pieces of information provided by LinkedIn is location tracking, which can provide valuable insights on user movement and patterns. You can use it to monitor workforce mobility patterns and conduct market research.

In this blog, you’ll learn how to build a LinkedIn profile location tracker using The Social Proxy’s scraper to interact and extract information from LinkedIn profiles. You’ll also learn how to map these locations using the geolocation lookup API as well as visualize with Leaflet.js.

What is a LinkedIn profile location tracker?

A LinkedIn profile location tracker is a tool that collects and analyzes the locations of LinkedIn users based on their posts. It provides a visual representation of where the user has been based on their shared content. By tracking and analyzing LinkedIn user locations, you can better understand user behavior, preferences, and interests.

Why is a LinkedIn profile location tracker important?

Tracking profile location on LinkedIn is beneficial for several reasons. For starters, recruiters often want to find users around a job location who would most likely be interested in job opportunities. This strategic search helps them identify the most suitable candidates, boosting their chances of finding the ideal candidate for the position.

In addition to job hunting or candidate screening, a LinkedIn profile location tracker can be helpful for several other reasons:

  • Location data helps applicants identify location-based skills and tools.
  • Analyzing location data can help you deliver better marketing campaigns and improve user segmentation to create content that is more relevant to them.
  • Location data also helps with competitor analysis. You can use it to create profiles of competitor brands and identify potential business partners in new markets.
  • In terms of potential partners and new markets, LinkedIn makes it easy to identify and understand the behavior of local influencers and thought industry leaders.

Understanding The Social Proxy’s tools

The Social Proxy is a cutting-edge tool that gives users access to both mobile and residential proxies according to their needs. With this tool, you can extract data from social media platforms with high anonymity, so you don’t get banned. The Social Proxy has various toolkits, from mobile and residential proxies to the Scraper API, AI Social lookup, and AI Geo lookup.

This article will focus on the scraper API and AI geo lookup. Scraper API provides access to rich data from various social networks like LinkedIn. On the other hand, AI Geo Lookup uses AI-powered algorithms to identify locations from the images.

Let’s use The Social Proxy Scraper API and geolocation lookup API to build a LinkedIn profile location tracker.

Setting up The Social Proxy API

Follow this step-by-step guide to set up The Social Proxy and use it to retrieve data from LinkedIn:

  • Visit The Social Proxy’s official website.
  • Click β€œLogin” if you already have an account. To create a new account, click β€œGet Started” and follow the next steps.
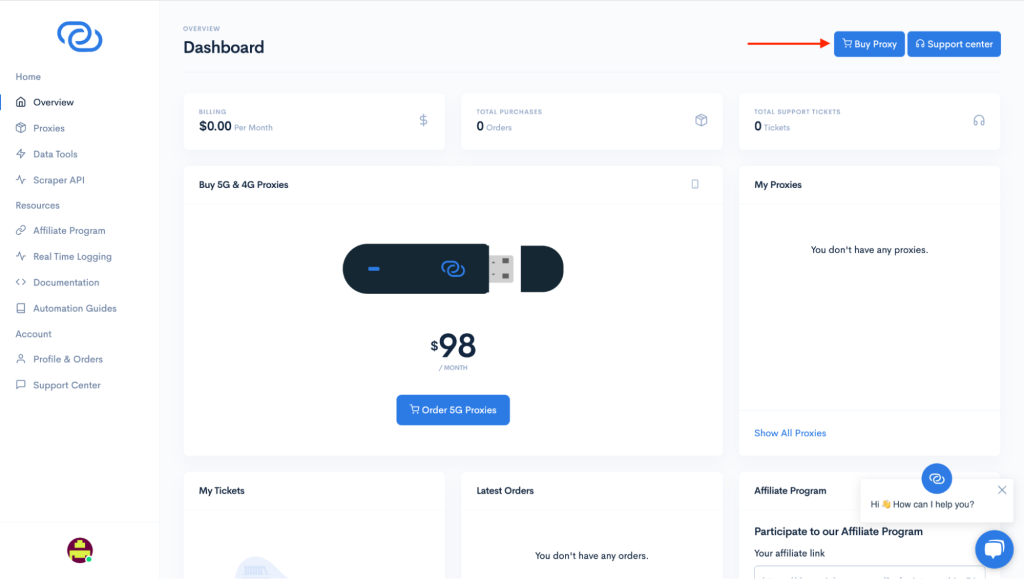
  • Go to your dashboard.
  • Click on β€œBuy Proxy” to select a plan.

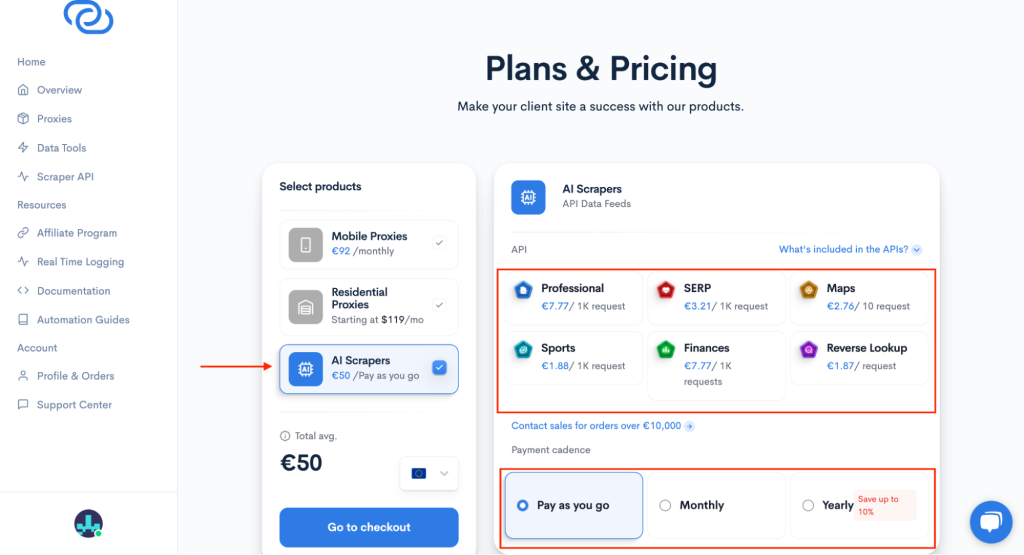
Choose a plan: In the buy proxies page, select β€œScraper API,” choose your subscription type, and click β€œCheckout.”

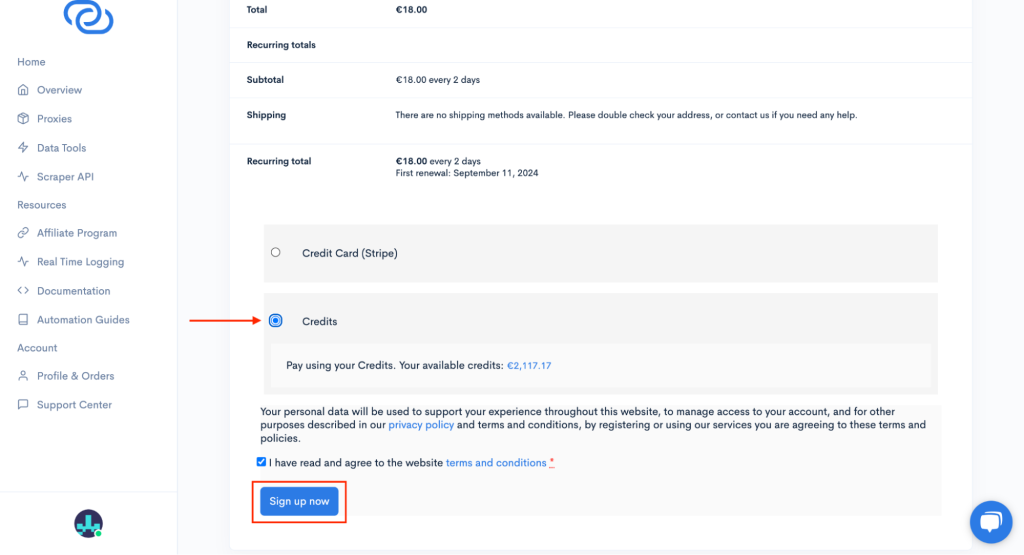
Payment details: On the payment page, select the β€œCredits” to pay using your credits and then click β€œSign up now.”

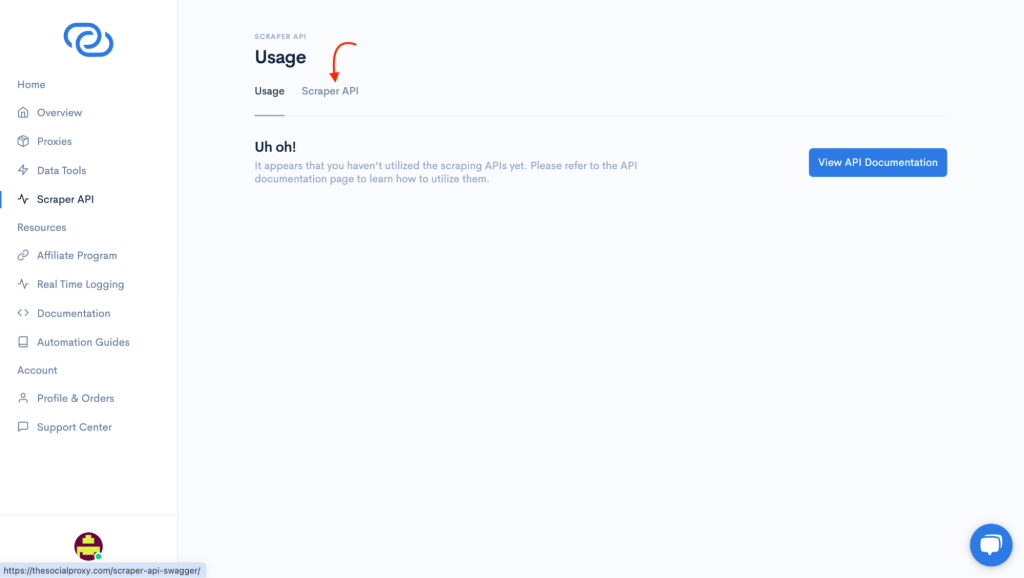
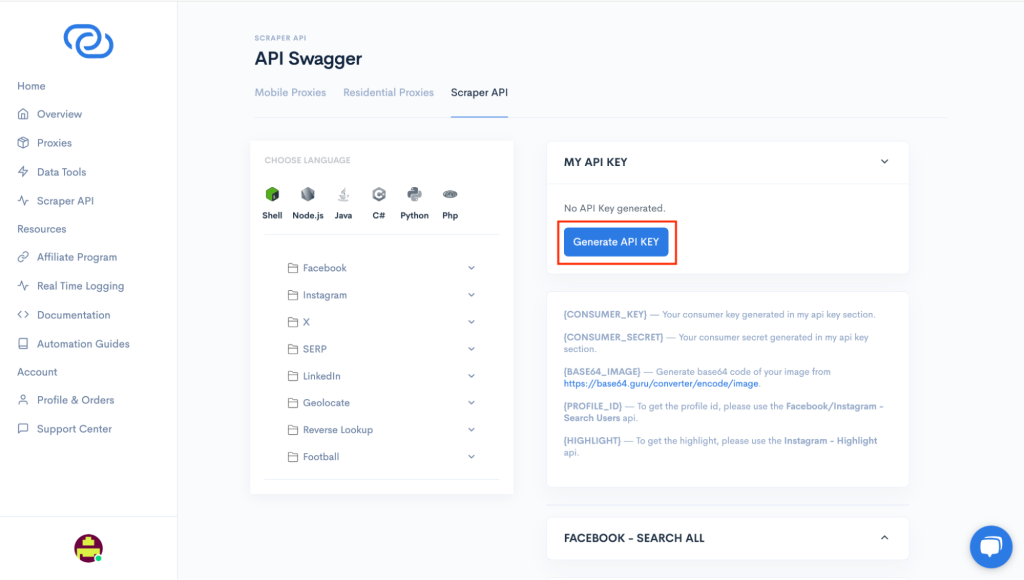
Generate your Scraper API keys: You need to generate your keys before you can start making API calls to the Scraper API. In the side menu, click β€œScraper API” and select β€œScraper API.”

Click on β€œGenerate API KEY”.

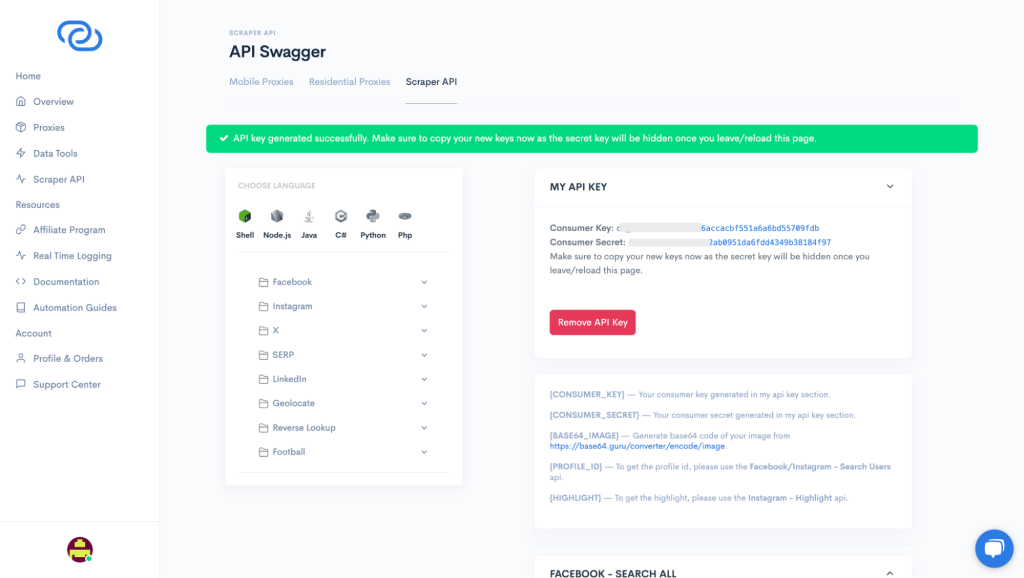
Copy your credentials: Copy your Consumer Key and Consumer Secret – you will need them in your code.

How to build a LinkedIn profile location tracker

In this section, we’ll review five steps to build a LinkedIn profile location tracker:

Step 1: Set up your development environment

First, you will need to create your development environment. To begin, ensure you have Node.js installed on your laptop. Then open VS Code, create a directory for your project, and launch a new terminal to initialize your Node.js project using:

				
					npm init -y


Use the code below to install axios and cheerio. Axios is an HTTP client for making requests to external services. Cheerio, on the other hand, provides syntax for parsing and manipulating HTML. They are both important for web scraping projects.

				
					npm install axios cheerio


  • Create a .env file with your project to store sensitive information securely.

Step 2: Scrape LinkedIn posts using The Social Proxy Scraper API

Within your .env file, add your scraper API key from The Social Proxy.

API_KEY = Consumer key: Consumer Secret

While The Social Proxy Scraper API allows you to scrape various social media platforms, you’ll most likely need to scrape the HTML and use a parser to extract specific data from the LinkedIn profile. This is where Axios and Cheerio come in handy.

Getting location URN with The Social Proxy API

To scrape the LinkedIn profiles within a specific location, you’ll need to use the /search/locations endpoint of the Scraper API to find the valid ID or URN for the location of interest. The code below uses Lagos, Nigeria as the location. The Axios library sends an HTTP GET request to the API and retrieves the location URN and ID. The retrieved data is then saved into a JSON file. Create a locationapp.js file and paste this code.

				
					require('dotenv').config();
const axios = require('axios');
const fs = require('fs');

const API_KEY = process.env.API_KEY;
const SCRAPER_API_URL = 'https://scraping-api.thesocialproxy.com/linkedin/v0/search/locations';

async function searchLinkedInLocation(query) {
  try {
    let requestUrl = `${SCRAPER_API_URL}?query=${encodeURIComponent(query)}`;

    const response = await axios.get(requestUrl, {
      headers: {
        'Api-Key': API_KEY, 
      }
    });

    console.log('Full API Response:', response.data);

    const locations = response.data.locations;

    console.log('Locations:', locations);

    storeScrapedData(locations, 'linkedinLocationData.json');

  } catch (error) {
    console.error('Error searching LinkedIn locations:', error.response ? error.response.data : error.message);
  }
}

function storeScrapedData(data, fileName) {
  const jsonData = JSON.stringify(data, null, 2);
  fs.writeFileSync(fileName, jsonData);
  console.log(`Scraped data saved to ${fileName}`);
}

searchLinkedInLocation('Lagos Nigeria');


Run your node.js file using `node locationapp.js`. You will find the URNs, which is urn:li:fsd_geo:105365761 for β€œLagos, Nigeria” within the linkedinLocationData.json. You will need this URN to search for people.

Getting LinkedIn Profiles with The Social Proxy API

Now that you have the location, you need to search for the profiles. Create a new node.js file called app.js and paste the code below. This code looks for “software developer”; you can always change it to search for any role. Similarly, we explore the LinkedIn endpoint to get and save the result in linkedinProfileData.json. To get more targeted results, you can use fields like first_name, last_name, and/or title. You can learn more about this endpoint by exploring the LinkedIn (search for people) documentation.

				
					require('dotenv').config();
const axios = require('axios');
const fs = require('fs');

const API_KEY = process.env.API_KEY;

const SCRAPER_API_URL = 'https://scraping-api.thesocialproxy.com/linkedin/v0/search/people';

async function searchLinkedInPeople(query, filters = {}, cursor = null) {
  try {
    let requestUrl = `${SCRAPER_API_URL}?query=${encodeURIComponent(query)}`;

    Object.keys(filters).forEach((key) => {
      requestUrl += `&${key}=${encodeURIComponent(filters[key])}`;
    });

    if (cursor) {
      requestUrl += `&cursor=${cursor}`;
    }

    console.log('Request URL:', requestUrl);

    const response = await axios.get(requestUrl, {
      headers: {
        'Api-Key': API_KEY, 
      }
    });

    console.log('Full API Response:', response.data);

    const data = response.data;

    console.log('Profiles:', data.people);  
    console.log('Next Cursor:', data.cursor);

    storeScrapedData(data.people, 'linkedinProfileData.json');

    if (data.cursor) {
      console.log('Fetching more results...');
      await searchLinkedInPeople(query, filters, data.cursor);
    } else {
      console.log('No more results to fetch.');
    }

  } catch (error) {
    console.error('Error searching LinkedIn people:', error.response ? error.response.data : error.message);
  }
}

function storeScrapedData(data, fileName) {
  const jsonData = JSON.stringify(data, null, 2);
  fs.writeFileSync(fileName, jsonData);
  console.log(`Scraped data saved to ${fileName}`);
}


searchLinkedInPeople('software developer', {
  locations: 'urn:li:fsd_geo:105365761'  // Replace with the valid URN
});


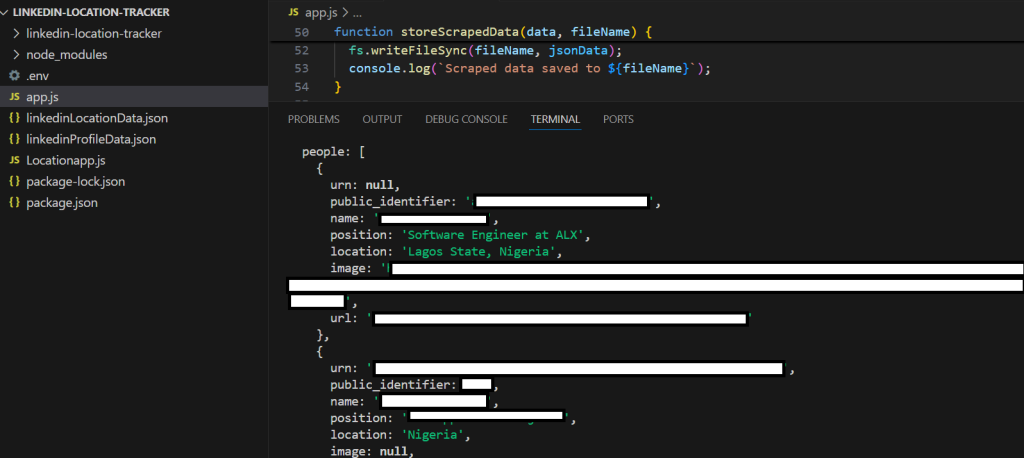
Here is the output:

Step 3: Analyze the text for mentioned locations

To analyze and identify location names, you’ll need to explore the NLP (Natural Language Processing) capabilities of Open AI API or use named entity recognition (NER) techniques. However, for this article, we’ll simply use a geocoding service like Nominatim to map those locations to countries.

Nominatim by OpenStreetMap is a free open-source that allows users to perform various geocoding tasks without an API key. First, create a analyzeLocations.js file. Within this file, you’ll write a script that uses Nominatim to determine the country of the various profiles in your linkedinProfileData.json. Run analyzeLocations.js using node `analyzeLocations.js`. The script’s output will be saved in a mappedLocations.json file.

				
					require('dotenv').config();
const axios = require('axios');
const fs = require('fs');

const profileDataPath = 'linkedinProfileData.json';

function loadProfileData() {
  const data = fs.readFileSync(profileDataPath);
  return JSON.parse(data);
}

async function mapLocationToCountryNominatim(location) {
  const url = `https://nominatim.openstreetmap.org/search?q=${encodeURIComponent(location)}&format=json&addressdetails=1`;

  try {
    const response = await axios.get(url);
    const results = response.data;

    if (results.length > 0) {
      return results[0].address.country || 'Unknown';
    } else {
      return 'Unknown';
    }
  } catch (error) {
    console.error('Error mapping location to country:', error.message);
    return 'Error';
  }
}

async function analyzeLocations() {
  const profileData = loadProfileData();
  const locations = [];


  for (const profile of profileData) {
    if (profile.location) {
      locations.push(profile.location);
    }
  }

  console.log('Extracted Locations:', locations);

  const mappedLocations = [];

  for (const location of locations) {
    const country = await mapLocationToCountryNominatim(location);
    mappedLocations.push({ location, country });
  }

  console.log('Mapped Locations:', mappedLocations);

  fs.writeFileSync('mappedLocations.json', JSON.stringify(mappedLocations, null, 2));
  console.log('Mapped locations saved to mappedLocations.json');
}

analyzeLocations();


Step 4: Use AI Geo Lookup to identify locations from images

Besides the Scraper API, The Social Proxy has an AI-based geo-location lookup tool. This tool uses machine learning and AI models to analyze images and determine their geographic location based on landmarks, landscapes and visible geographic insights.

To geolocate by image, you need to make a POST call to the GEO LOCATE (image) endpoint: POST /wp-json/tsp/geolocate/v1/image

Example detection scenarios
Here, we’ll analyze the profile pictures of the LinkedIn profiles we scraped earlier. The code below will run through the image URL and produce an analysis.

				
					const axios = require('axios');
const fs = require('fs');
require('dotenv').config();

// Load API Keys from .env file
const CONSUMER_KEY = process.env.CONSUMER_KEY;
const CONSUMER_SECRET = process.env.CONSUMER_SECRET;

const profileDataPath = 'linkedinProfileData.json';
const outputFilePath = 'locationPredictions.json';

// Load profile data from JSON file
function loadProfileData() {
  const data = fs.readFileSync(profileDataPath);
  return JSON.parse(data);
}

// Function to convert image URL to Base64
async function imageUrlToBase64(imageUrl) {
  const response = await axios.get(imageUrl, { responseType: 'arraybuffer' });
  const base64 = Buffer.from(response.data, 'binary').toString('base64');
  return base64;
}

// Function to identify location from image
async function identifyLocationFromImage(imageBase64) {
  try {
    const response = await axios.post(
      `https://thesocialproxy.com/wp-json/tsp/geolocate/v1/image?consumer_key=${CONSUMER_KEY}&consumer_secret=${CONSUMER_SECRET}`,
      { image: imageBase64 },
      { headers: { 'Content-Type': 'application/json' } }
    );
    return response.data;
  } catch (error) {
    console.error('Error identifying location from image:', error.response ? error.response.data : error.message);
    return null;
  }
}

// Analyze locations in images and save results to a file
async function analyzeImageLocations() {
  const profileData = loadProfileData();
  const results = [];

  for (const profile of profileData) {
    if (profile.image) {
      console.log(`Analyzing image for ${profile.name} at ${profile.image}`);
      try {
        const imageBase64 = await imageUrlToBase64(profile.image);
        const locationData = await identifyLocationFromImage(imageBase64);
        const predictions = locationData && locationData.data && locationData.data.geo_predictions
          ? locationData.data.geo_predictions
          : [];

        results.push({
          name: profile.name,
          image: profile.image,
          location: profile.location,
          predictions: predictions
        });

      } catch (error) {
        console.error('Error:', error);
        results.push({
          name: profile.name,
          image: profile.image,
          location: profile.location,
          predictions: 'Error'
        });
      }
    } else {
      console.log(`No image available for ${profile.name}`);
      results.push({
        name: profile.name,
        image: null,
        location: profile.location,
        predictions: 'No image available'
      });
    }
  }

  fs.writeFileSync(outputFilePath, JSON.stringify(results, null, 2));
  console.log(`Results saved to ${outputFilePath}`);
}

analyzeImageLocations();


The output will be saved in a locationPredictions.json file.

Now that you have explored AI Geo Lookup, you can explore visualization.

Step 5: Build a map to visualize the locations with Leaflet.js

To visualize your data, you will use Leaflet.js, a lightweight and robust JavaScript library for creating maps without a GIS background.

First, you will need to initialize Leaflet.js within an HTML file.

				
					<!DOCTYPE html>
<html lang="en">
<head>
    <meta charset="UTF-8">
    <meta name="viewport" content="width=device-width, initial-scale=1.0">
    <title>Map Visualization</title>
    <link rel="stylesheet" href="https://unpkg.com/leaflet/dist/leaflet.css" />
    <style>
        #map {
            height: 100vh;
            width: 100%;
        }
    </style>
</head>
<body>
    <div id="map"></div>
    <script src="https://unpkg.com/leaflet/dist/leaflet.js"></script>
    <script src="map.js"></script>

</body>
</html>


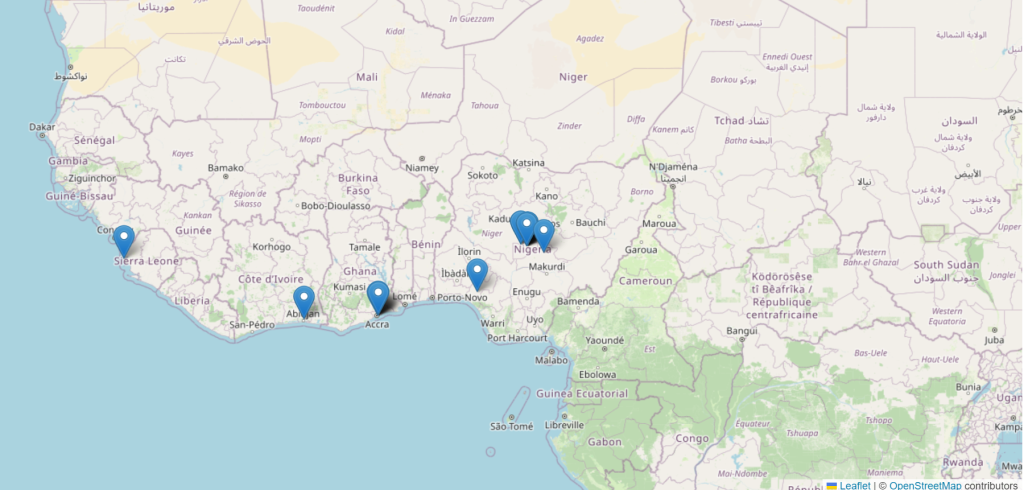
Within the map.js, you will also fetch data from the locationPredictions.json file and use the address, similarity score, and geographic coordinates attributes. To view the map, open map.html locally in your web browser after running `npm install -g http-server` and `http-server`.

				
					// map.js

// Initialize the map
const map = L.map('map').setView([10, 10], 2); // Set initial view

// Add OpenStreetMap tiles
L.tileLayer('https://{s}.tile.openstreetmap.org/{z}/{x}/{y}.png', {
    attribution: '&copy; <a href="https://www.openstreetmap.org/copyright">OpenStreetMap</a> contributors'
}).addTo(map);

// Load location data from JSON file
fetch('locationPredictions.json')
    .then(response => response.json())
    .then(data => {
        data.forEach(location => {
            location.predictions.forEach(prediction => {
                const [lat, lon] = prediction.coordinates;
                L.marker([lat, lon])
                    .bindPopup(`<b>${location.name}</b><br>Address: ${prediction.address}<br>Score: ${prediction.score}`)
                    .addTo(map);
            });
        });
    })
    .catch(error => console.error('Error loading location data:', error));


By leveraging Leaflet’s tile-based map rendering, the map generated can display the data and allow zoom flexibility.

Conclusion

From personal to business, building a LinkedIn profile tracker proves useful for analyzing marketing trends and identifying talent. The Social Proxy helps you get this information quickly and across various platforms.

To maximize the benefit of this project, you can change the infrastructure to support real-time tracking or store the data for some time to visualize workforce mobility over time. You can also give another spin to this project by exploring other social media platforms like Instagram or marketplaces like Zillow for real-estate market analysis. Check out the various solutions provided by The Social Proxy for reliable scraping and data analysis today!

Accessibility tools

Powered by - Wemake